The news of World IPv6 Launch Day last week prompted me to properly set up IPv6 for my home network. Unfortunately my ISP doesn’t offer native IPv6 connectivity — not many consumer ISPs do — but fortunately there are free services which will provide an IPv6 ‘tunnel’ over the IPv4 internet, to the wider IPv6 world. I signed up to Hurricane Electric’s service at tunnelbroker.net and was soon up and running. Hurricane Electric will issue you a /64 block of IPv6 addresses, which you can allocate as you see fit. You need to set up one system to handle your end of the tunnel, and route all traffic destined for the wider IPv6 internet over the tunnel. I already had a Linux server running that was handling the local end, but since I’ve recently acquired an Asus RT-N16 router running DD-WRT, I decided to enable IPv6 support on it and use it as the tunnel endpoint, so it can serve as the default gateway for both IPv4 and IPv6 on my LAN.
To do this you need to be running one of the DD-WRT builds with IPv6 support, I am using the “mega” build which includes pretty much everything. As well as enabling IPv6 support in the DD-WRT admin web interface, you need to set up a custom script to bring up the tunnel when the router starts up. The script I used is below – you need to replace the following:
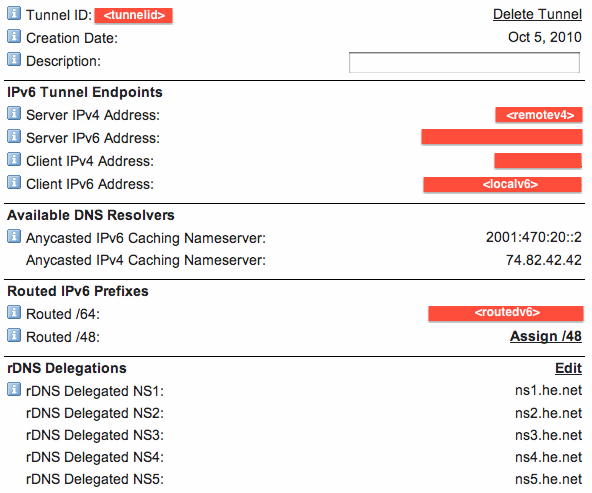
(userid)- the User ID shown on the tunnelbroker.net page when you log in
(md5password)- the MD5 hash of your tunnelbroker.net password
(tunnelid)- the Tunnel ID of your tunnel
(remotev4)- the IPv4 address of the remote end
(localv6)- the IPv6 address of the local end
(lanv6)- one IPv6 address, out of your routed IPv6 /64, allocation that you want to use for your router on your LAN
insmod ipv6
WANIP=$(nvram get wan_ipaddr);
wget -O - 'https://ipv4.tunnelbroker.net/ipv4_end.php?ipv4b=AUTO&user_id=(userid)&pass=(md5password)&tunnel_id=(tunnelid)'
ip tunnel add he-ipv6 mode sit remote (remotev4) local $WANIP ttl 255
ip link set he-ipv6 up
ip -6 addr add (localv6) dev he-ipv6
ip -6 addr add (lanv6) dev br0
ip -6 route add ::/0 dev he-ipv6
echo 1 > /proc/sys/net/ipv6/conf/all/forwarding
radvd -C /tmp/radvd.conf
This image shows where to find some of the information in your tunnelbroker.net page:

The setup script needs to be saved, as a custom startup script, in the Administration -> Commands section of the DD-WRT web interface.
I had also enabled radvd in the DD-WRT web interface to advertise the gateway to the wider IPv6 world on my LAN, but for me it failed to start on boot, so I added the radvd -C /tmp/radvd.conf line to make sure it starts after the tunnel is configured. The configuration file used for radvd is below, replace (routedv6) with your routed IPv6 /64 allocation, including the /64, and paste it into the box for radvd config in the DD-WRT web interface:
interface br0
{
   AdvSendAdvert on;
   prefix (routedv6)
   {
       AdvOnLink on;
       AdvAutonomous on;
   };
};
This setup means that on the other computers on the LAN (all Macs), I can set “Configure IPv6: Automatically” in the Network Preferences and IPv6 connectivity just works. The other machines on the LAN will configure themselves based on the information radvd sends out, using stateless autoconfiguration. However, this ease of use comes with a security risk…
Read More...
